If you own a Bluetti power station or plan to buy one, choosing the right size solar panel directly affects how quickly you recharge off-grid and whether you stay within your unit's safe input limits. Undersized panels stretch a full recharge across multiple sunny days, cutting into your runtime when you need it most. Oversized panels can exceed the voltage ceiling of your model's charge controller, risking damage or simply wasting money on capacity you cannot use.
This guide walks Bluetti owners through the essential specs - wattage, voltage, and connector type - so you can match a solar array to your model's maximum solar input, open-circuit voltage range, and charging goals. Whether you camp occasionally or rely on solar backup at home, understanding these limits helps you invest in panels that charge efficiently without exceeding what your power station can handle.
You will learn how to read your Bluetti's input specifications, calculate realistic charging times based on panel wattage and sunlight conditions, and avoid common mismatches that either slow you down or push voltage beyond safe thresholds. By the end, you will know exactly which panel sizes fit your model and how to balance cost, portability, and recharge speed for your specific use case.
Start With Your Bluetti Model's Solar Input Specs
Every Bluetti power station has a maximum solar input wattage, a voltage range, and a current limit printed on the unit or listed in the manual - these specs define the absolute ceiling for the solar panel you can safely connect. Before shopping for panels, locate your model's input specifications, typically found on a label near the solar charging port or in the technical section of the user guide. For example, a Bluetti AC200P accepts 12 - 60 V and up to 700 W of solar input, while the EB55 is limited to 12 - 28 V and 200 W maximum.
If you exceed the voltage range, the charge controller may reject the input or, in rare cases, sustain damage; if you exceed the wattage limit, the station will simply cap charging at its rated maximum, but you'll have paid for unused capacity. Current limits - often expressed in amps - work together with voltage to define total power: volts × amps = watts. Check all three values to ensure your panel configuration stays within the safe operating window.
Most Bluetti models use an XT60 or aviation-style plug, so confirm connector type as well to avoid adapter confusion later. Matching your panel's output to these hard limits ensures safe, efficient charging and prevents both underperformance and potential hardware issues.
Calculate Your Daily Power Needs
Calculating your daily power needs is the first step in matching a solar panel to your Bluetti power station. Start by listing every device you plan to run - laptop, phone, lights, mini fridge, or CPAP machine - and note its wattage, which is usually printed on the device label or power adapter. Multiply each device's wattage by the number of hours you'll use it per day to get watt-hours for that item, then add them all together for your total daily consumption.
For example, a 50-watt laptop used for four hours consumes 200 watt-hours, a 10-watt LED light used for five hours adds 50 watt-hours, and a 60-watt CPAP for eight hours uses 480 watt-hours, giving you a daily total of 730 watt-hours. If you want to recharge your power station fully during available daylight, your solar panel must deliver at least that many watt-hours after accounting for efficiency losses and the number of peak sun hours in your location.
Most areas receive between three and six peak sun hours per day, so divide your daily watt-hour total by the hours you expect to harvest sunlight. Using the 730 watt-hour example with five peak sun hours, you'd need a panel delivering at least 146 watts under ideal conditions - meaning a 200-watt panel provides a practical margin for clouds, angle losses, and temperature effects. This calculation ensures your panel can keep up with your usage rather than slowly draining your station over several days.
Keep in mind that actual solar output varies with season, shading, and panel orientation, so it's smarter to size slightly larger than your minimum to avoid shortfalls on overcast days or when the sun sits lower in winter. By anchoring your panel choice to real consumption data, you avoid both undersized setups that never catch up and oversized panels that cost more than your charging window can use.
Factor in Real-World Solar Efficiency and Sunlight Hours
Rated panel wattage reflects performance under ideal laboratory conditions - direct sunlight at a specific angle, 25°C panel temperature, and no shading. In real-world use, expect your solar panel to deliver 60 - 80% of its rated capacity due to factors like angle, temperature, cloud cover, and atmospheric haze.
Peak sun hours measure the equivalent number of hours per day when sunlight intensity averages 1,000 watts per square meter. Most U.S. regions receive between 3.5 and 6 peak sun hours daily, depending on season and latitude. Southern states typically see 5 - 6 hours in summer, while northern areas may drop to 3 - 4 hours in winter. Coastal and mountainous zones introduce additional variability from fog and weather patterns.
To estimate realistic charge time, multiply your panel's rated wattage by 0.7 (the middle of the efficiency range), then divide your power station's battery capacity in watt-hours by that derated output. A 200 W panel delivering 140 W of real-world power would need roughly 7 hours to recharge a 1,000 Wh Bluetti station under consistent peak sun conditions. Always add a buffer for suboptimal angles or partial cloud cover.
Seasonal planning matters if you rely on solar year-round. A panel array sized for winter sun hours will charge faster in summer, while a summer-optimized setup may struggle to meet energy needs during shorter, cloudier winter days. Check historical sun data for your zip code to balance panel count against your typical daily load and storage capacity.
Sizing Examples: Small, Medium, and Large Bluetti Models
Matching panel size to your Bluetti model starts with two numbers: the station's battery capacity and its maximum solar input. A compact unit like the EB3A holds 200Wh and accepts up to 200W of solar power, so a single 100W panel will recharge it in roughly two to three hours of full sun, while a 200W panel reaches the input ceiling and cuts that time in half. For daily top-ups or weekend camping, 100W offers a lightweight, portable balance; for faster recovery between evening loads, 200W makes better use of short weather windows.
Mid-size stations such as the AC200P store 2,000Wh and support solar inputs up to 700W. Pairing this capacity with a 400W array - two 200W panels in parallel - delivers a practical recharge rate of four to six hours under good sun, leaving headroom below the limit to avoid voltage spikes. Stepping up to 700W, either as a single high-output panel or three smaller units, maximizes charge speed and proves useful when you need the station ready by afternoon or when cloud cover reduces effective wattage. The trade-off is bulk and cost: a 700W setup requires more roof or ground space and higher up-front investment, but it keeps a large battery cycling through multi-day trips without grid access.
Large-capacity models like the AC300 paired with expansion batteries can exceed 3,000Wh and accept 2,400W of solar input. At this scale, a 1,200W array - six 200W panels or three 400W panels - handles moderate loads and partial recharge, while the full 2,400W configuration, often eight to twelve panels, supports continuous high-draw appliances and daily full cycles. Panel count climbs quickly, so confirm your setup location can accommodate the physical spread and that your connector system supports parallel or series strings without exceeding voltage limits. For overlanding or stationary backup, starting at 1,200W and adding panels as budget allows delivers a smooth ramp rather than forcing an all-or-nothing purchase.
In each scenario, round your panel wattage to stay within the station's input ceiling, then adjust panel count based on how many hours of full sun your location offers and how often you need a complete recharge. Smaller stations benefit from compact, foldable panels that fit in a hatchback; larger systems reward rigid frames that mount securely and tilt for better sun angles throughout the day.
Common Mistakes to Avoid When Sizing Solar Panels
Exceeding your Bluetti's maximum input voltage is the most critical mistake - oversized panels or incorrect series configurations can damage the charge controller permanently. Always verify that your panel or array's open-circuit voltage stays below the model's published VOC limit, even in cold weather when panel voltage rises.
Ignoring connector compatibility wastes time and risks poor connections. Bluetti stations use MC4, XT60, or proprietary aviation plugs depending on the model, so confirm your panel's output matches before purchase or budget for a compatible adapter cable.
Oversizing wattage beyond the station's maximum solar input will not increase charge speed - your unit will simply cap at its rated input, and you'll pay for capacity you can't use. Match panel wattage to your model's solar input spec, or stay slightly below for budget efficiency.
Underestimating real-world losses leads to longer charge times than expected. Clouds, haze, off-angle sun, and temperature all reduce panel output by 20 - 40 percent, so plan for 60 - 70 percent of rated wattage in typical conditions and consider winter sun angle when sizing for year-round use.
Forgetting cable gauge and length also degrades performance - thin or overly long extension cables introduce voltage drop that can prevent charging entirely or slow intake significantly. Use appropriately sized solar extension cables and keep runs as short as practical, especially on lower-voltage 12 V systems.
Double-check polarity and connector orientation before plugging in; reversed connections can damage input circuits even if physical connectors fit. Most MC4 connectors are keyed, but improvised adapters or loose pins can bypass this protection.
Parallel and Series Configurations: When and How
Connecting multiple solar panels to your Bluetti power station requires choosing between parallel and series configurations, each affecting voltage and current in different ways. Parallel wiring keeps voltage constant while adding current - useful when you want more power without exceeding your station's maximum input voltage. Series wiring adds voltage while keeping current constant, which works well for high-capacity Bluetti models that accept higher input voltages and benefit from reduced current draw.
Wire panels in parallel when your combined panel voltage already matches your Bluetti's optimal input range but you need more charging current. Connect the positive terminals together and the negative terminals together; if each panel outputs 20 V and 5 A, two panels in parallel will deliver 20 V at 10 A. This approach keeps you safely below voltage limits on models like the EB3A or AC60, which cap input at lower voltages.
Use series wiring when your Bluetti model supports higher input voltage - such as the AC200P, AC200MAX, or AC300 - and you want to push more wattage through a single input without hitting current limits. In series, connect the positive terminal of one panel to the negative terminal of the next; two 20 V, 5 A panels in series yield 40 V at 5 A. This reduces resistive losses in the cable and can speed charge times, but only if your station's voltage window accommodates the combined output.
Always use panels with identical specifications - same wattage, voltage, and current rating - when wiring in parallel or series. Mismatched panels will perform at the level of the weakest unit, wasting capacity and potentially creating voltage imbalances. Check your Bluetti's manual for maximum input voltage and current; exceeding either limit risks triggering over-voltage or over-current protection, stopping the charge.
If you need both more voltage and more current, you can combine methods: wire pairs of panels in series, then connect those series strings in parallel. This hybrid approach requires careful calculation to stay within both voltage and current boundaries, and it benefits larger systems like the AC300 or AC500 that offer wide input ranges and high wattage ceilings. The key is to map your configuration on paper first, confirm total output falls within your station's input spec, and use properly rated connectors and cable gauges to handle the combined load safely.
Final Takeaway: Match Specs, Derate for Reality, Test Before Relying
Choosing the right size solar panel for your Bluetti power station comes down to three steps: match the specs, derate for real-world conditions, and test before you depend on it. Start by confirming your model's maximum solar input - voltage range, wattage limit, and connector type - then select panels that stay safely within those boundaries. Calculate your daily watt-hour consumption and divide by realistic sun hours in your location to find the panel wattage you actually need, not just the nameplate rating.
Real-world output will be lower than the label suggests. Expect 70 - 80% of rated capacity on average due to temperature, angle, shading, and cable losses. A 200-watt panel may deliver 140 - 160 watts under typical field conditions, so size up if you need faster charging or plan to run loads while the sun is shining. Parallel arrays can increase current and speed, but only if your charge controller and input port support the combined wattage without exceeding voltage limits.
Before relying on your solar setup for an emergency or off-grid trip, run it for a full day in real conditions. Measure actual charge time, note how cloud cover affects input, and confirm your cables and connectors stay secure. Iterative learning - adjusting tilt, clearing shade, or adding a second panel - will teach you more than any calculator. The right size is the one that meets your power needs within your Bluetti's limits, delivers predictable performance in the field, and leaves room for efficiency losses you can't avoid.
Key Factors to Match: Panel to Power Station
- Max solar input wattage: do not exceed your Bluetti model's limit
- Voltage range: ensure panel open-circuit voltage (Voc) falls within your unit's accepted range
- Connector type: verify MC-4, DC7909, or adapter compatibility
- Current limit: confirm max input current is not exceeded, especially with parallel arrays
- Portability vs. capacity: balance panel size and weight with your use case
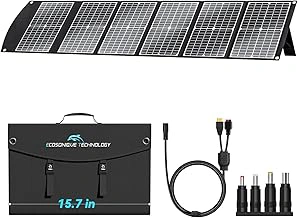
SOLUPUP 100W Portable Solar Panel for Power Station
The SOLUPUP 100W Portable Solar Panel offers a wallet-friendly entry point for charging smaller Bluetti power stations like the EB3A or EB55. Priced at $86.99, this panel delivers rated 100-watt output in a foldable, portable design that stores easily and sets up quickly at the campsite or during an outage.
At the listed output, this panel suits light-duty charging scenarios: topping off a small power station over a sunny afternoon, maintaining battery levels during multi-day trips with modest device loads, or slowly recharging units after evening use. It won't fill a large-capacity Bluetti in a single day, but it matches the input range of compact models and keeps weight and bulk manageable for one-person carry.
Portability is the main advantage here. Folding panels in this wattage class typically weigh under ten pounds and pack flat for transport. You can lean the panel against a backpack, hang it from a tailgate, or angle it on the ground without heavy stands or complex hardware. For users who prioritize packability over maximum speed, a 100 W panel strikes a practical balance.
Before connecting, confirm your Bluetti model accepts the panel's voltage output and connector type. Most Bluetti stations under listed-capacity work well with 100 W input, but double-check the manual's solar input range and match the DC connector or use the adapter cable supplied with your station. Voltage mismatch or incorrect polarity can prevent charging or risk damage, so verify compatibility first.
The panel's 4.9-star rating reflects solid user satisfaction, though real-world wattage will fluctuate with sun angle, cloud cover, and temperature. Expect multiple in strong midday sun and lower output during morning, evening, or partly cloudy conditions. Plan charging time accordingly and treat the 100 W label as a peak figure rather than a constant rate.
If you own a larger Bluetti like the AC200P or AC300, this panel's output will feel slow; consider chaining multiple panels or stepping up to a higher-wattage option. For compact power stations and weekend use, the SOLUPUP 100W delivers dependable, portable charging at a budget-conscious price.
- ✅ Affordable at $86.99
- ✅ Foldable and portable design
- ✅ Rated 100 W output suits small Bluetti models
- ✅ 4.9-star user rating
- ⚠️ Slower charging for large-capacity stations
- ⚠️ Real-world wattage varies with conditions
- ⚠️ Requires voltage and connector verification before use
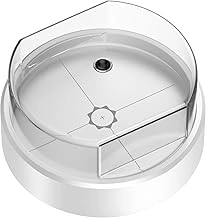
Metal Solar Angle Guide for Solar Panels
Positioning your solar panel at the correct angle toward the sun can increase charging output by multiple% compared to a flat or poorly angled setup. The Metal Solar Angle Guide is a low-cost accessory designed to help you find and lock in the optimal tilt quickly, without guesswork or complicated measuring tools.
This guide attaches to the side or edge of most portable solar panels and displays preset angle markings that correspond to common sun elevation ranges throughout the day and season. By adjusting the panel to match the angle indicator that aligns with your latitude and time of year, you can maximize the wattage flowing into your Bluetti power station. The metal construction holds up to outdoor conditions better than plastic alternatives, and the compact design adds minimal weight or bulk to your solar setup.
At $9.99, this is one of the simplest upgrades you can make to improve real-world charging performance - especially when camping or off-grid where every watt counts. The angle guide doesn't require tools to read and can be repositioned as the sun moves, making it practical for both stationary installs and on-the-go adjustments. If your Bluetti model supports high-wattage solar input, capturing that extra multiple% from better panel angle can shorten charging time meaningfully and make full use of your panel's rated capacity.
- ✅ Helps increase solar charging output by 10 - 30% through improved panel angle
- ✅ Metal construction is durable and weather-resistant
- ✅ Preset angle markings simplify setup without measuring tools
- ✅ Compact and lightweight, adds minimal bulk to portable panels
- ✅ Affordable upgrade at $9.99
- ⚠️ Requires manual repositioning as sun position changes throughout the day
- ⚠️ Angle markings may not match every latitude or seasonal scenario perfectly
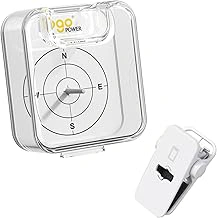
Togo POWER Solar Angle Guide for Portable Solar Panel
The Togo POWER Solar Angle Guide offers a budget-friendly way to improve solar panel alignment without carrying bulky stands or metal brackets. Priced at $8.99, this accessory is designed for users who move portable panels multiple times a day and want a lightweight reference tool rather than a permanent mounting solution.
Unlike metal angle guides that add weight and require assembly, this guide provides a simple visual reference to help position panels closer to the optimal tilt for morning, midday, and afternoon sun. The 4.4-star rating reflects its practical utility for campers and van users who prioritize portability and quick adjustments over precision angle measurement.
The tradeoff is clear: you gain packability and low cost, but you sacrifice the rigid stability and exact degree markings found in heavier metal guides. If you frequently reposition your Bluetti solar panels throughout the day - such as tracking shade lines or adjusting for changing sun angles - this lightweight guide simplifies setup without adding bulk to your gear bag. For stationary installs or users who prefer fixed angles, a heavier stand may offer more consistent results.
The guide works with most foldable and portable panels that use kickstands or ground placement. It does not replace a stand, but it helps you eyeball effective tilt angles quickly, which can improve charging speed compared to laying panels flat.
- ✅ Budget-friendly at $8.99
- ✅ Lightweight and easy to pack
- ✅ Simplifies quick angle adjustments for users who move panels frequently
- ⚠️ Does not provide the rigid stability of metal stands
- ⚠️ Lacks precise degree markings for exact angle measurement
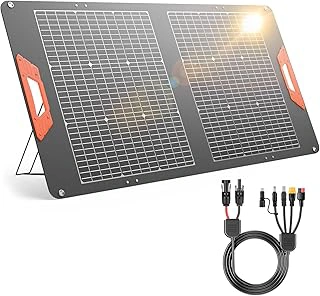
100W Portable Foldable Solar Panel for Power Stations
The 100W Portable Foldable Solar Panel for Power Stations offers a compact, budget-friendly option for pairing with mid-range Bluetti models like the EB3A, EB55, or AC60. This panel folds into a carry-friendly form factor and lists a maximum output of multiple, making it suitable for topping off smaller capacity stations or supplementing larger units during extended camping trips.
Build quality focuses on portability: the foldable design reduces packed size, and the kickstand props the panel at an adjustable angle for better sun exposure. The panel is rated 4.5 out of 5 based on user feedback, with most comments highlighting reliable performance in good sunlight and straightforward setup. Because the brand and detailed voltage specifications are not disclosed, verify that your Bluetti model's input voltage range (typically multiple for 100 W-compatible units) aligns before purchase, and confirm connector compatibility or plan to use an adapter cable.
At $86.99, this panel competes on price with similar 100 W foldable options. It lacks the verified higher-wattage headroom or premium weatherproofing found in pricier panels, so expect performance to drop more noticeably in partial shade or overcast conditions. For occasional use or as a secondary charging source, the combination of portability, user rating, and cost makes it a practical choice - just match the wattage and voltage to your Bluetti's input spec sheet and charging timeline before committing.
- ✅ Compact foldable design for easy transport and storage
- ✅ Adjustable kickstand for angling toward the sun
- ✅ Budget-friendly at $86.99
- ✅ 4.5/5 user rating indicates reliable field performance
- ⚠️ Brand and detailed voltage specs not fully disclosed
- ⚠️ Performance may drop in partial shade or clouds
- ⚠️ Connector compatibility should be verified for specific Bluetti models