This guide is for apartment renters with a south-, east-, or west-facing balcony who want to add solar charging without modifying walls or railings. A small solar generator setup fits well if you have at least 4 - 6 square feet of unshaded floor or railing space and no HOA or lease restrictions on visible solar panels. You'll be able to power small devices like phones, laptops, LED lights, fans, or a portable refrigerator, but not high-draw appliances like window air conditioners or full-size heaters that exceed typical 200 - 500 W continuous output limits.
This approach works only if your balcony receives direct sunlight for at least three to four hours per day. North-facing balconies, spots shaded by neighboring buildings or overhangs, and locations with HOA solar bans are not suitable. The entire installation must be reversible - no drilling, no permanent brackets, and no hardwired connections - so you can remove everything when you move. If you cannot meet these constraints, rooftop solar or a grid-tied system may be more appropriate, but those options fall outside renter-friendly territory.
Before you begin, check your lease for language about exterior modifications, fire-code balcony clearances, and weight limits on railings or floors. Many leases permit freestanding equipment but prohibit adhesive mounts or anything that penetrates surfaces. Knowing these boundaries up front helps you avoid installation methods that could forfeit your security deposit or violate building rules.
What Matters Most in Balcony Solar Setups
Sunlight hours matter more than panel wattage when you're working with limited balcony space. A 100-watt panel in six hours of direct sun will deliver far more energy than a 200-watt panel stuck in two hours of partial shade. Start by mapping your balcony's sun exposure throughout the day - south-facing balconies in the Northern Hemisphere typically receive the longest direct light, while east or west orientations give you morning or afternoon windows.
Balcony orientation and obstructions define your usable charging window. Tall buildings, tree canopies, neighboring structures, and roof overhangs all cast shadows that shift as the sun moves. Walk your balcony at different times to identify the brightest zone, then measure how many unobstructed hours that spot receives. This real-world assessment tells you whether a foldable panel on the floor or a tilted panel leaning against the railing will capture more light.
Power station capacity should match realistic charge rates, not aspirational panel specs. A 500-watt-hour station paired with a 100-watt panel in four hours of good sun will recharge roughly 80 percent on a clear day, accounting for conversion losses. Oversized batteries extend runtime but take multiple days to fill if your balcony only offers partial sun. Right-sizing keeps expectations grounded and helps you plan backup charging from an indoor outlet when weather doesn't cooperate.
Cable management must respect fire codes and lease restrictions. Draping extension cords across walkways or pinching cables in sliding doors creates tripping hazards and potential fire risks. Use outdoor-rated cables with weatherproof connectors, secure them along the balcony edge with adhesive clips that remove cleanly, and avoid blocking emergency egress paths. Check your lease for prohibitions on permanent brackets or drilling into railings - most apartments require removable setups that leave no damage.
Fixed-mount solutions offer stable angles but often require hardware that violates rental agreements. Portable floor or railing placements let you adjust panel position as the sun shifts and pack everything away when you move. Foldable panels with built-in kickstands adapt to seasonal sun angles without tools, while rigid panels leaning against railings may need sandbags or bungee cords to stay secure in wind. Portability trades some efficiency for flexibility, but in a rental balcony context, removable gear keeps you compliant and mobile.
Choosing the Right Generator and Panel Size
Balcony solar setups succeed when generator capacity and panel wattage match your available space, sunlight hours, and typical daily load. A 200 - 300Wh generator paired with a 40 - 100W panel works well on small balconies with three to five hours of direct sun, handling phone charging, small fans, or LED lights. These compact systems fit tight railings and stay within typical renter weight limits.
If you have a larger balcony with six or more feet of unobstructed railing and need to power laptops, mini-fridges, or multiple devices simultaneously, a 600 - 1000Wh generator with a 100 - 200W panel becomes practical. The higher capacity stores enough energy for evening use, and the larger panel recharges the battery in a reasonable window when sunlight is consistent.
Oversized panels waste money in shade-prone or partially obstructed balconies because rated wattage assumes ideal angle and full sun. A 200W panel producing only 40W in dappled shade costs more upfront and delivers no advantage over a properly sized 60W panel. Measure your balcony's sun exposure at different times of day before committing to larger equipment - brief morning light or late-afternoon shadows cut usable charging hours and make high-wattage panels inefficient.
Match your system size to realistic daily consumption: calculate watt-hours for each device you intend to charge, add 20% for conversion losses, and choose a generator that holds at least that total. Pair it with a panel that can recharge 70 - 100% of that capacity during your balcony's brightest window, so you maintain usable reserve without relying on grid top-ups every evening.
Step 1: Position the Solar Panel
Positioning the solar panel correctly determines how much power your system will generate throughout the day. The two most common balcony placements are railing-mount and floor-stand configurations, each suited to different balcony layouts and renter restrictions.
Railing mounts clamp or strap directly to the balcony rail, keeping the panel elevated and out of foot traffic. This approach works best on south-facing balconies (in the Northern Hemisphere) where the railing itself won't cast a shadow across the panel surface during peak sun hours. Floor stands use adjustable kickstands or tripod bases to position the panel at an angle on the balcony deck, offering flexibility when railing space is limited or when you need to angle the panel away from overhead shade cast by upper-floor balconies or roof overhangs.
Tilt angle matters more than most renters expect. For maximum year-round output, aim to angle the panel between 30 and 45 degrees relative to the horizontal plane, with the exact optimum matching your latitude. A 40-degree tilt works well across most of the continental United States. Many portable panels include adjustable kickstands with pre-set notches at common angles; if yours doesn't, a simple wood block or PVC prop can achieve the same result.
Seasonal angle changes can boost output by 10 to 20 percent if you're willing to adjust twice a year. In summer, reduce the tilt closer to 30 degrees to capture the sun's higher arc; in winter, increase it toward 50 degrees as the sun rides lower on the horizon. Mark your preferred positions with tape or a permanent marker so future adjustments take seconds.
Wind resistance is the overlooked safety concern on balconies. Even a 50-watt panel catches enough breeze to tip or slide if not secured. Use bungee cords, ratchet straps, or zip ties to anchor the frame to the railing or a heavy object on the deck. Avoid adhesive hooks or suction cups as primary anchors - they fail in direct sun and temperature swings. Position cords so they don't create trip hazards near doorways or seating areas.
Shade is the performance killer. Walk your balcony at different times of day and note where shadows fall from railings, furniture, potted plants, and neighboring structures. Even partial shade across one cell in a panel can reduce total output by half due to how cells are wired in series. If morning shade is unavoidable, prioritize unobstructed access to afternoon sun when most apartment dwellers are home and using power.
Step 2: Route Cables Safely Indoors
Routing cables from your balcony solar panel to an indoor power station requires planning to avoid damage, air leaks, and tripping hazards. Most apartment setups use a flat window-pass extension cord designed for sliding glass doors or a low-profile under-door cable channel that allows the door to close securely without pinching the wire. These adapters are typically less than 6 mm thick and feature weatherproof outer jackets that seal against moisture when the door sits on them. Position the cable at one corner of the door track rather than the center to minimize the gap and reduce air infiltration during heating or cooling months.
Keep the power station itself indoors, ideally near an outlet for pass-through charging and away from direct sunlight or high-traffic areas where someone might trip over cables. Running the solar input cable indoors protects the battery from temperature extremes, prevents theft, and keeps the inverter and charge controller accessible for monitoring. Use cable clips or adhesive hooks along the baseboard to secure loose wire runs and prevent snagging. Inspect the cable path for sharp edges on door frames or furniture corners that can wear through insulation over time, and add protective sleeves or foam wrap where the wire bends tightly.
Check that all outdoor connectors - MC4 or barrel plugs - are fully seated and rated for outdoor use, with rubber seals intact to block rain entry. Avoid coiling excess cable tightly on the balcony, which can create heat buildup in direct sun and reduce current flow; instead, lay it flat in a shaded corner or hang it loosely on a hook. If your lease prohibits drilling or permanent modifications, choose adhesive cable management solutions and reversible door seals that leave no marks when removed. This approach keeps the installation renter-friendly while maintaining a clean, safe cable path that won't be damaged every time you open or close the door.
Step 3: Connect and Test the System
Once your panel is positioned and angled, connect the solar cable to the charge controller or power station input port, matching positive to positive and negative to negative. Most small solar generators use a simple barrel or MC4 connector that clicks or screws into place - tighten firmly but do not force. Turn on the unit's display or check the LCD screen for incoming wattage; you should see a non-zero solar input value within a few seconds if the panel is receiving direct sunlight.
If the display shows zero watts, first verify that the panel is not shaded and is angled toward the sun. Check both ends of the cable for loose or partially seated connectors, and wipe the panel surface with a soft cloth to remove dust or smudges that can block light. Confirm that any inline fuses or switches on the charge controller are in the correct position. Once input registers, note the wattage reading - on a clear day, a 100-watt panel typically delivers 60 - 85 watts depending on angle and time of day.
With the system connected and charging, estimate baseline charge time by dividing the battery capacity in watt-hours by the average solar input wattage. For example, a 300 Wh battery receiving 70 watts of solar input will take roughly four to five hours to charge from empty under steady sun. Cloud cover, morning or late-afternoon light, and sub-optimal angle will extend this window, so treat the first charge cycle as a learning baseline rather than a fixed benchmark.
Common Mistakes to Avoid
Leaving your power station outside overnight exposes it to moisture, condensation, and theft - most units are not rated for continuous outdoor use and should be brought inside when charging is complete. Ignoring partial shade can cripple your entire panel: because solar cells are wired in series, even a small shadow across one corner can drop output by 50% or more, so check for moving shade patterns throughout the day. Using a household extension cord that's too thin or too long will cause voltage drop between the panel and power station, wasting energy and slowing charge times - always match wire gauge to the panel's amperage and keep runs under 25 feet when possible. In winter months, lower sun angles and shorter daylight hours mean your panel may deliver only 30 - 40% of its summer yield, so adjust your expectations and don't rely on a full daily charge. Finally, overestimating daily solar yield leads to frustration: a 100 W panel in real-world balcony conditions typically delivers 200 - 350 Wh per day, not the theoretical maximum, so plan your usage around conservative numbers and monitor actual performance for a week before committing to routine loads.
Optimizing Your Daily Charge Cycle
Maximizing energy capture from a balcony solar panel comes down to managing the daily charge cycle with simple habits that match the sun's path. The most productive window for solar generation is between 10 a.m. and 3 p.m., when the sun is highest and light strikes the panel most directly. If your balcony allows safe access, repositioning your panel twice daily - once in mid-morning and again around noon - can boost total energy yield by 20 to 30 percent compared to a fixed setup. This active approach works best for users who are home during daylight hours and comfortable making minor angle adjustments.
For passive setups, choose a single tilt angle that averages the midday sun position for your latitude and season, then leave the panel in place. This trade-off sacrifices peak efficiency but eliminates the need for daily interaction and works well for renters who prefer a set-and-forget system. Dust, pollen, and urban grime reduce light transmission over time, so wipe down the panel surface weekly with a damp microfiber cloth to maintain full output. Avoid abrasive cleaners or rough materials that can scratch the protective glass.
Seasonal tilt adjustments matter more than many balcony users expect. In summer, the sun rides higher, so a lower tilt angle - closer to flat - captures more direct light. In winter, increase the tilt to match the sun's lower arc across the sky. A difference of 15 to 20 degrees between summer and winter positions can recover 10 to 15 percent of potential output during the shorter days when every watt counts. Mark your optimal angles with tape on the panel frame or stand legs so seasonal changes take less than a minute. These small habits turn a static balcony installation into a responsive system that delivers consistent performance year-round without complex hardware or mounting modifications.
Final Takeaway
Setting up a small solar generator on your apartment balcony is a practical way to power small electronics and build energy independence, but it works best when you treat it as supplemental charging rather than whole-apartment backup. Most balcony setups can reliably run lights, charge phones and laptops, or keep a small fan going, but they won't replace your main electrical service or handle high-draw appliances like air conditioners or full-size refrigerators.
Realistic capacity expectations are essential. A 500 Wh power station paired with a 100 W panel in partial shade might only capture 200 - 300 Wh on a typical day, enough to top off a laptop and a few devices but not enough to run continuous loads. Before investing in larger panels or multiple batteries, confirm your balcony actually receives consistent sunlight during peak hours and that your lease allows the installation.
Because you rent, always design your system to be portable and easy to dismantle. Use adhesive hooks instead of drilling, secure cables with removable clips, and keep all components lightweight enough to move in one trip. This approach protects your security deposit, simplifies relocation, and lets you take the system with you when your lease ends.
Start small with a single panel and a modest power station, then track daily yields for at least two weeks across different weather conditions. If your balcony proves viable and your usage patterns justify expansion, you can add capacity incrementally. Scaling too quickly without understanding your real-world generation limits often leads to underused equipment and wasted investment.
Pre-Setup Requirements
- Verify lease allows balcony solar panels and battery storage
- Measure balcony dimensions and railing height
- Track sunlight exposure times for one full day
- Identify interior outlet within 10 feet of panel placement
- Check balcony weight limits if mounting heavy equipment
- Confirm no obstructions (awnings, neighbor walls, trees) block midday sun
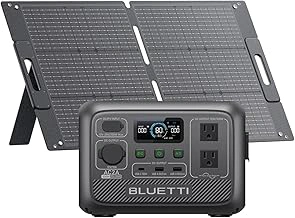
BLUETTI AC2A Portable Power Station with 100W Solar Panel, 204Wh
The BLUETTI AC2A paired with its 100W solar panel delivers faster recharge times on a balcony setup, making it a practical choice when you want to maximize solar input during limited daylight hours. The 204Wh lithium battery holds enough capacity to run a laptop, charge phones, or power a portable fan for several hours, and the included 100W panel can recharge the station in multiple peak sun hours under favorable conditions.
The 100W panel measures larger than typical multiple alternatives, so you'll need adequate railing or floor space - roughly the listed size by the listed size - to mount or lean it securely. The station itself is compact and sits comfortably on a small table or balcony shelf. The included MC4-to-XT60 cable connects the panel to the AC2A's solar input port; keep the cable organized along the railing or under a weatherproof cover to avoid tripping hazards and UV damage over time.
This configuration suits renters who want to recharge daily essentials without drilling or permanent fixtures. The folding panel design simplifies storage when weather turns poor or when you need to bring the system indoors overnight. At $299.00, the bundle balances upfront cost with faster solar recovery, reducing the wait between discharge cycles compared to lower-wattage panel kits.
Consider this setup if your balcony receives at least four hours of direct sun per day and you have the floor or railing space for the larger panel. The faster input means you can top off the battery during a workday and have power ready by evening for lights, a small appliance, or emergency backup.
- ✅ 100W panel recharges the 204Wh battery in 3 - 4 peak hours
- ✅ Compact station fits on small tables or shelves
- ✅ Folding panel design for easy indoor storage
- ✅ No drilling or permanent installation required
- ⚠️ Larger panel footprint requires more balcony space
- ⚠️ Cable management needed to avoid trip hazards
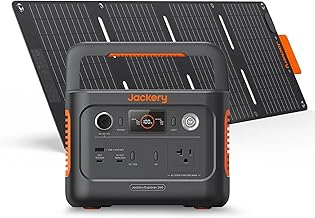
Jackery Solar Generator 240 v2 with 40W Mini Solar Panel, 256Wh LiFePO4 Battery
The Jackery Solar Generator 240 v2 pairs a 256Wh LiFePO4 battery with a compact 40W mini solar panel, making it one of the smallest-footprint solar setups for narrow apartment balconies. LiFePO4 chemistry offers longer cycle life than traditional lithium-ion - typically 3,multiple+ charge cycles - so the battery maintains capacity over years of use. The 40W panel measures significantly smaller than standard multiple panels, fitting easily on railings or small tables without blocking walkways.
Because the panel is only 40W, expect slower solar input: under full sun, the 256Wh battery takes roughly the listed amount to recharge from empty, compared to multiple with larger panels. This tradeoff favors users who prioritize space savings and battery longevity over rapid recharge speed. The 256Wh capacity powers small devices - phones, tablets, LED lights, laptops - but is not sized for appliances or tools.
The unit includes AC, USB-A, USB-C, and DC outputs, and the panel connects via a single DC cable with no separate charge controller required. The compact design and integrated handle make it easy to move indoors during bad weather or when you leave for extended periods. At $249.00, it balances entry-level pricing with the durability benefits of LiFePO4 chemistry, though the smaller panel and battery mean it's best suited for light, intermittent loads rather than daily heavy use.
If your balcony is narrow, you rarely need more than listed-capacity at a time, and you value a battery that will last thousands of cycles, this configuration makes sense. If you need faster solar charging or higher capacity, consider models with larger panels and battery banks.
- ✅ LiFePO4 battery offers 3,000+ charge cycles for long-term durability
- ✅ 40W mini panel has the smallest footprint, ideal for narrow balconies
- ✅ Integrated design with no separate charge controller needed
- ✅ Portable with handle; easy to move indoors or store
- ⚠️ 40W solar input takes 6 - 7 hours for full recharge under optimal sun
- ⚠️ 256Wh capacity limits use to small electronics and lights
- ⚠️ Slower charging may not keep up with daily high-draw needs
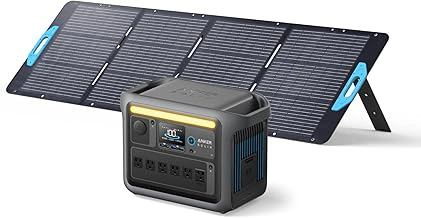
Anker SOLIX C1000 Portable Power Station with 200W Solar Panel, 1056Wh LiFePO4 Battery
The Anker SOLIX C1000 offers 1,056Wh of storage using a LiFePO4 battery, making it the highest-capacity option in this guide for apartment balcony setups. The included 200W solar panel measures roughly the listed amount × the listed size when unfolded, so you'll need at least multiple square feet of unobstructed balcony floor or railing space to position it effectively. This unit weighs approximately the listed size for the power station and the listed size for the panel, which matters if your building has weight restrictions or older balcony construction.
LiFePO4 chemistry typically supports multiple,000+ charge cycles before capacity drops to multiple%, which translates to years of daily use without significant degradation. For renters planning to stay long-term or who want to take the system to a future residence, the higher upfront cost spreads across a longer usable lifespan compared to standard lithium-ion cells. The 1,056Wh capacity can run a small refrigerator for multiple or a CPAP machine for multiple nights, assuming typical draw rates of multiple.
The 200W panel recharges the C1000 in roughly the listed amount under direct midday sun, but balcony shading, seasonal angle changes, and weather will extend that window. You can tilt the included kickstand to match your latitude, though fine-tuning throughout the year improves harvest. The unit includes AC outlets, USB-A, USB-C, and a car port, so you can charge phones, laptops, and small appliances simultaneously without adding adapters.
Because the panel and station together occupy more space than compact 100W setups, measure your balcony layout before ordering. If your balcony is narrow or shared, consider whether the footprint will block walkways or violate lease terms about obstructions. The C1000's higher capacity and durable battery chemistry make sense if you're powering medical devices, working from home during outages, or running energy-intensive gear that smaller units can't sustain overnight.
- ✅ 1,056Wh capacity supports refrigerators or CPAP machines for extended periods
- ✅ LiFePO4 battery rated for 3,000+ cycles, offering multi-year durability
- ✅ 200W solar panel recharges the unit in 6 - 7 hours of direct sun
- ✅ Multiple output ports (AC, USB-A, USB-C, 12V) handle simultaneous devices
- ⚠️ Combined 42-pound weight may exceed limits on older balconies
- ⚠️ Requires 5 - 6 square feet of clear space for panel placement
- ⚠️ Higher upfront cost at $649.99 compared to smaller capacity units
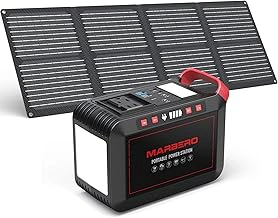
MARBERO 237Wh Solar Generator Portable Power Station with 60W Foldable Solar Panel
The MARBERO 237Wh portable power station paired with its 60W foldable solar panel offers renters a low-cost entry point to test whether balcony solar makes sense for their space. The 237-watt-hour lithium battery handles USB charging for phones and tablets, LED lights, and laptop power - enough for emergency backup or extending device runtime between wall charges, but not for running kitchen appliances or continuous loads.
The included 60W foldable panel collapses to briefcase size, making storage inside the apartment straightforward when weather turns or when you're away. Set the panel on a balcony railing or propped against the wall during peak sun hours; the relatively low wattage means you'll see full recharge times stretching across one to two sunny days depending on angle and season. The single DC output barrel jack connects the panel directly to the power station's input port without requiring separate charge controllers.
Output options include two AC outlets (rated for multiple continuous, surge), USB-A, USB-C, and multiple car ports. This mix covers phones, small fans, CPAP machines on low settings, and other sub-high-wattage devices. Trying to pull more than multiple continuously will trip the internal protection and shut down the inverter until you reset it. The compact footprint - roughly the size of a toaster - fits tucked beside a balcony planter or under a small table.
Because the 60W panel recharges slowly and the 237Wh capacity drains quickly under AC loads, this setup suits occasional use rather than daily off-grid living. It's a practical way to confirm your balcony receives enough sun and to learn the rhythm of charging cycles before committing to larger, pricier systems. If you discover you need more capacity or faster solar input after a few weeks of real-world use, you'll have hands-on data to guide the next step.
- ✅ Foldable 60W panel stores easily inside apartment
- ✅ 237Wh capacity sufficient for phones, lights, and laptops
- ✅ Low upfront cost to test balcony solar viability
- ✅ Multiple output ports including AC, USB-A, USB-C, and 12V
- ⚠️ 60W panel delivers slow recharge requiring one to two full sunny days
- ⚠️ 200W continuous AC output limits use to small devices only
- ⚠️ 237Wh capacity drains quickly under AC loads