We may earn a commission when you buy through links on this page, at no extra cost to you. How this works.
Portable solar panels promise specific wattages and voltages, but the only way to confirm those numbers - or diagnose why your panel isn't charging as expected - is to measure them yourself. A digital multimeter gives you the data you need to verify advertised output, troubleshoot underperformance, confirm that your charge controller is receiving the correct voltage and amperage, and support warranty claims with documented readings.
Basic voltage testers can tell you whether a panel is producing power, but they don't capture the full picture. USB inline meters work well for small USB-output panels, yet they miss the higher-voltage DC systems most portable solar setups rely on. Dedicated solar MPPT analyzers offer real-time power tracking, but they add cost and complexity that many users don't need for occasional testing.
This guide reviews four digital multimeters chosen for their ability to measure the DC voltage and current ranges typical of portable solar panels, from compact 20-watt foldables to 200-watt rigid arrays. Each meter balances measurement accuracy, durability, and ease of use differently, so the right choice depends on whether you need basic output verification, frequent field testing, or detailed troubleshooting across multiple panel configurations.
The four models cover budget-friendly options for occasional checks, mid-range meters with auto-ranging and data hold for field convenience, and higher-end units with true RMS and Bluetooth logging for users managing multiple panels or off-grid systems. By the end, you'll know which meter fits your testing routine and solar setup.
Use the matching tool first
Start with Balcony Solar Recharge Time Calculator if you want to narrow the fit before checking current offers.
Why Every Solar Panel Owner Needs a Digital Multimeter
Portable solar panels rarely deliver the wattage printed on the box. Real-world conditions - cloud cover, panel angle, temperature, and even dust - cut output by 20 to 40 percent compared to manufacturer ratings, which assume ideal lab conditions at 77°F and perpendicular sunlight. Without a digital multimeter, you're operating blind.
A multimeter lets you measure open-circuit voltage and short-circuit current, the two numbers that define whether your panel is functioning properly. Open-circuit voltage shows the maximum electrical potential when nothing is connected. Short-circuit current reveals the maximum current the panel can supply. Together, these measurements confirm whether your panel is meeting its rated specs or suffering from degradation.
Panel failure modes are invisible to the eye. Shading from a tree branch can drop output by half. Corrosion at the MC4 connector adds resistance that bleeds power as heat. Internal cell damage from impact or manufacturing defects creates dead zones that reduce voltage. A multimeter catches these problems immediately, before you waste hours troubleshooting your power station or wondering why your batteries never fill.
Tracking voltage and current over time also reveals gradual degradation. Crystalline solar cells lose efficiency as they age, typically one to two percent per year. By logging measurements every few months, you can spot when a panel drops below usable output and needs replacement. This is especially valuable for panels used in marine or off-grid installations where reliability matters.
For users testing maximum power point tracking controllers, a multimeter confirms whether the MPPT algorithm is working. Measure the voltage at the panel output and again at the battery input. The MPPT controller should adjust voltage to maximize current flow. If the numbers don't align with the controller's claimed efficiency, you've identified either a setup issue or a defective unit.
A basic multimeter answers the most common solar question: is my panel the problem, or is something else in the chain failing? That single data point saves time and prevents costly guesswork when diagnosing portable power systems.
How to Safely Test Your Portable Solar Panel's Voltage and Output
Testing your portable solar panel starts with understanding what you're measuring and why each reading matters. Open-circuit voltage (Voc) tells you the maximum voltage your panel produces with no load attached, while short-circuit current (Isc) shows the maximum current when terminals are directly connected. Loaded output - the power your panel delivers to a real device or battery - sits between these two extremes and gives you the most practical picture of performance.
Before you connect your multimeter, check the panel's rated specifications on its label or documentation. A typical 100-watt portable panel might list 18-20V open-circuit voltage and 5-6A short-circuit current. These numbers provide your baseline for comparison.
To measure open-circuit voltage, set your multimeter to DC voltage mode, usually marked as V with a solid and dashed line. Touch the red probe to the positive terminal and the black probe to the negative terminal. Polarity matters: reversing the probes won't damage most meters, but you'll see a negative reading. If your panel uses MC4 connectors, you may need adapter cables or carefully insert probes into the connector housings without forcing them. The reading should appear steady in full sun, though clouds or changing panel angle will cause it to fluctuate immediately.
Short-circuit current testing requires more caution. Set your meter to DC amperage mode, typically 10A or 20A range depending on your panel size. With the panel in full sun, touch probes directly to the positive and negative terminals for no more than a few seconds. This creates a dead short, and while the panel's internal resistance limits current, prolonged testing can heat terminals or damage smaller meters not rated for the current. Many users skip this test entirely and rely on loaded measurements instead.
For loaded output, connect your panel to a charge controller or USB device, then measure voltage across the input terminals of that load. This reading will be lower than open-circuit voltage - often 14-17V for a 100W panel charging a 12V battery - because the load pulls current and internal resistance causes voltage drop. To measure current under load, you must break the circuit and insert the meter in series, meaning current flows through the meter itself. Connect the red probe to the positive wire from the panel and the black probe to the positive terminal of your load, with the negative wire connected directly.
Common mistakes include testing in partial shade or late afternoon when low light produces readings far below rated specs. Even a small shadow across one cell can cut output dramatically. Fluctuating readings during partly cloudy conditions are normal, not a sign of malfunction. Another frequent error is using the wrong probe placement for current measurement: touching probes across terminals in amperage mode can blow the meter's internal fuse because you've created a short circuit through a low-resistance shunt.
Misinterpreting readings also trips up new users. A 100W panel rarely produces 100 watts in real conditions - expect 70-85W in good sun due to temperature, angle, and efficiency losses. If your voltage reads correct but current seems low, check that the panel faces the sun squarely and no partial shading exists. If both voltage and current read near zero, verify probe contact and polarity, then check for blown fuses in your meter.
Always handle exposed terminals carefully, especially on higher-voltage panels. While 20V won't shock you, accidental shorts can create sparks or heat. Keep metal tools and jewelry away from terminals, and never test with wet hands or in rain. For panels with bare wire leads, use electrical tape to secure connections and prevent accidental contact during testing.
Reading and Interpreting Your Solar Panel Test Results
Comparing your measured values to the manufacturer's specifications helps you determine whether your solar panel is performing as expected. Most portable panels are rated under ideal laboratory conditions - direct sunlight at 1,000 watts per square meter and 25°C cell temperature - so real-world output typically falls 5 - 10% below the rated wattage even when everything is working correctly.
Start by checking the voltage first. Open-circuit voltage (measured with no load connected) should come close to the spec sheet value, usually within a volt or two. If you see significantly lower voltage, inspect the panel surface for damage or connection corrosion. Next, measure current while the panel is under load or connected to a charge controller. Expect this number to fluctuate based on sun intensity and angle; midday readings in full sun will be highest, while morning or late afternoon measurements drop off as the sun moves lower in the sky.
Environmental factors play a larger role than many users expect. A 15-degree change in the panel's angle relative to the sun can reduce output by 10 - 15%. Even partial shading from a tree branch or roof edge can cut power dramatically, especially on panels without bypass diodes. High ambient temperatures also reduce efficiency - most crystalline silicon panels lose about 0.4% output for every degree Celsius above 25°C. Cable resistance matters too; thin or long extension cables between the panel and your meter or charge controller will cause voltage drop and lower the power reading.
When output falls more than 15 - 20% below the rated spec in good sunlight, work through these troubleshooting steps. First, verify the panel is angled directly at the sun and completely unshaded. Clean the surface with a damp cloth to remove dust or film. Check all connectors for corrosion or loose contacts, and swap out any suspect cables. Test again at solar noon on a clear day. If the numbers are still low, measure the open-circuit voltage and short-circuit current separately; a normal voltage but weak current often points to internal cell damage, while low voltage across the board suggests a wiring fault or diode failure. Consistent underperformance after these checks may indicate a warranty claim or the need for panel replacement.
When to Use a Dedicated Solar Meter vs. a Standard Multimeter
Choosing between a dedicated solar meter and a standard multimeter depends on how often you test panels and what else you need to measure. A standard digital multimeter measures voltage and current at a single moment, which is enough to verify that a portable solar panel is producing power and to troubleshoot basic connection issues. Most models under $50 handle DC voltage up to 600V and current readings in the amp range typical of small solar setups, making them practical for occasional users who also work on batteries, inverters, or household circuits.
Dedicated solar meters - sometimes called MPPT testers or solar power meters - display real-time wattage by multiplying voltage and current internally, and many log peak output over time. This saves you from calculating watts manually and makes it easier to compare panel performance under changing sunlight. The streamlined interface is helpful if you regularly test multiple panels or need to confirm maximum power point tracking on charge controllers. However, these meters rarely include resistance, capacitance, or continuity functions, so they won't replace a multimeter for general electrical diagnostics.
If you maintain an off-grid system or test panels weekly, a solar-specific meter speeds up the workflow and reduces user error. For weekend campers or van builders who check panel output a few times per season, a capable multimeter offers broader utility without the added cost of a second device. The key tradeoff is convenience versus versatility: solar meters streamline one task, while multimeters handle a wider range of electrical measurements at the expense of a few extra button presses.
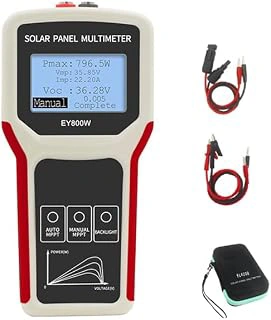
Solar Panel Tester Photovoltaic Multimeter with Smart MPPT and LCD
The Solar Panel Tester Photovoltaic Multimeter with Smart MPPT and LCD offers portable solar users a purpose-built tool that monitors panel performance without requiring traditional multimeter setup. Priced at $39.85, this tester sits between basic voltage-only meters and professional-grade instruments, delivering real-time wattage, voltage, and MPPT tracking data on a built-in LCD screen.
Unlike handheld digital multimeters that require manual probe placement and range selection, this dedicated solar panel tester connects inline between your panel and charge controller or battery, continuously displaying power output as conditions change. The smart MPPT tracking function helps identify whether your panels are hitting maximum power point under current sunlight conditions - useful when diagnosing underperformance or testing panel orientation.
The LCD readout shows multiple parameters simultaneously, eliminating the need to cycle through measurement modes. You can watch wattage climb as clouds pass or voltage stabilize after shade moves off your array. This real-time feedback makes it easier to optimize panel placement or identify cable resistance issues compared to spot-checking with a traditional meter.
Setup is straightforward for most portable solar systems using standard DC connectors. The inline design means you don't need to hold probes against terminals or worry about contact resistance affecting readings. For panel owners who want to monitor performance during a camping trip or track degradation over time, this approach is more convenient than pulling out a multimeter every time you want a measurement.
Current measurement range may not cover every use case. Very high-wattage arrays or systems exceeding typical portable panel outputs could push beyond the tester's amperage limits. Connector compatibility also matters - if your setup uses non-standard plugs, you'll need adapters or may be better served by a traditional multimeter with universal leads.
The unit works best for monitoring rather than fault diagnosis. If you need to measure individual cell voltages, test continuity, or troubleshoot charge controller circuits, a full-function digital multimeter remains the better tool. This tester focuses on panel output tracking, not comprehensive electrical testing.
For portable solar owners who primarily need to verify panel performance and MPPT efficiency, the combination of continuous monitoring, purpose-built design, and sub-multiple price delivers practical value without the complexity of higher-end analyzers.
Check current price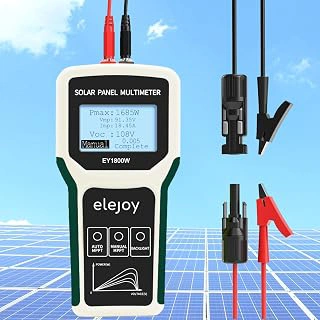
1800W Solar Panel MPPT Photovoltaic Multimeter with LCD
The 1800W Solar Panel MPPT Photovoltaic Multimeter fills the gap for users planning to scale beyond typical portable setups. With an 1800-watt power ceiling, it handles voltage and amperage readings from larger arrays - multiple, multiple, or stacked panels - without hitting measurement limits that constrain smaller meters.
This device tracks the same core metrics as entry-level MPPT testers: open-circuit voltage, short-circuit current, and maximum power point output. The LCD display shows real-time wattage, which helps when optimizing panel angle or diagnosing output drops across multiple panels in parallel. The higher capacity becomes relevant when your portable array exceeds multiple or when you anticipate adding panels to an existing kit.
At $62.99, the price sits above budget multimeters but below pro-grade clamp meters with data logging. The tradeoff is straightforward: if your current or planned array stays under multiple, a lower-capacity meter will deliver the same readings at lower cost. If you're testing a multiple folding array, dual multiple panels, or a rooftop setup during travel, the 1800W ceiling helps reduce the chance of measurement clipping and gives headroom for peak production on cold, bright mornings.
The unit does not include advanced features like Bluetooth connectivity, memory storage, or auto-ranging beyond the wattage limit. It works as a dedicated solar tester rather than a general-purpose multimeter, so users needing AC voltage testing or resistance measurements will still want a separate tool. The 4.3/5 rating reflects reliable performance within its wattage range, though the lack of brand support or detailed documentation may require some trial during initial setup.
Choose this meter when your system design pushes past multiple or when future expansion is likely. For single multiple panels or portable power station testing under multiple, the capacity premium offers little practical advantage.
- ✅ 1800W capacity handles larger portable arrays and parallel panel configurations
- ✅ LCD shows real-time wattage for MPPT output optimization
- ✅ Price competitive for high-capacity solar-specific testing
- ⚠️ Overkill for typical 100 - 200W portable panels
- ⚠️ No data logging, Bluetooth, or memory features
- ⚠️ Limited documentation and brand support
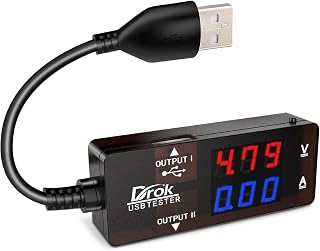
DROK USB-A 2.0 Digital Multimeter with Dual Output PD QC 3.0 Color LED Display
The DROK USB-A 2.0 Digital Multimeter ($13.99) is the most affordable option for basic solar monitoring, but only if your setup includes USB output ports. This inline meter fits between a USB-A cable and your device, displaying voltage and current on a compact color LED screen. It's designed for charge controllers or solar panels with built-in USB outlets, not for measuring voltage directly at photovoltaic terminals.
The color display shows voltage (typically 5V) and real-time amperage draw, making it easy to confirm whether your USB-charged devices are pulling power as expected. At under multiple, it's a practical entry point for users who only need to monitor USB charging performance and don't require the voltage range or precision of a dedicated multimeter.
The limitation is obvious: you can't use this meter to measure open-circuit voltage, test panel health under load, or troubleshoot wiring upstream of the USB port. If your charge controller or solar generator offers USB outputs and you want quick feedback on charging speed, this form factor works. If you need to measure voltage directly from panel terminals or verify MPPT efficiency, the dedicated meters reviewed earlier are necessary.
Visibility is strong indoors and in partial shade thanks to the bright LED numerals, though direct sunlight can wash out the display. The dual-output design allows pass-through charging while monitoring, so you don't sacrifice a port to gather data.
This meter is sufficient for confirming that your USB devices are charging and for spotting obvious drops in current. It's not a diagnostic tool for panel performance or system voltage troubleshooting. For users whose primary need is USB-port monitoring on a budget, it fills that gap without the complexity of a handheld multimeter.
- ✅ Lowest-cost option at $13.99
- ✅ Color LED display easy to read indoors and in shade
- ✅ Dual output allows charging while monitoring
- ✅ Simple plug-and-play setup for USB ports
- ⚠️ Only works with USB-A outputs, not direct panel terminals
- ⚠️ No open-circuit voltage or system diagnostics
- ⚠️ Display washes out in direct sunlight
- ⚠️ Limited to USB voltage range, typically 5V
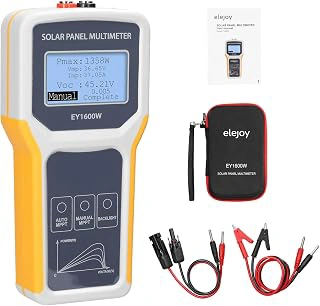
1600W Solar Panel DC/AC Power Meter MPPT Photovoltaic Multimeter with LCD
The 1600W Solar Panel DC/AC Power Meter measures both direct current from your solar panels and alternating current after your inverter, making it a practical choice if you want to track efficiency across your entire portable solar setup. Priced at $41.99, it costs more than the budget-friendly BTMETER BT-multiple but includes AC monitoring, which the basic DC-only multimeters skip entirely.
The LCD screen displays voltage, amperage, and wattage for both DC input and AC output, so you can compare what your solar panel generates against what your inverter delivers to your devices. This dual capability matters most when you're troubleshooting inverter performance, comparing conversion losses, or testing MPPT charge controllers that feed AC loads. If your portable solar system stays purely DC - charging batteries or running DC appliances - the AC function remains unused, and a simpler DC multimeter will serve you just as well.
The unit handles up to 1600W, which covers the output range of most portable solar panel kits between multiple and 600W, plus room for monitoring higher-wattage inverter loads. The display updates continuously, so you can watch real-time power fluctuations as clouds pass or panel angles shift. Because it measures both sides of the power chain, you'll see exactly how much energy your inverter consumes during conversion, helping you decide whether your inverter matches your panel capacity or wastes power in standby mode.
Compared to the BTMETER recommended as the overall best pick, this meter sacrifices some build refinement and probe quality for the added AC capability. If you run an inverter regularly and want to confirm its efficiency or diagnose output issues, the dual measurement justifies the price. If you only need to verify panel voltage and current at the DC stage, the BTMETER remains the more versatile general-purpose option with better probe leads and a lower price point.
The 4.3/5 rating reflects solid reliability for the price, though some users report the display 1600W Solar Panel DC/AC Power Meter MPPT Photovoltaic Multimeter with LCD fades in direct sunlight and the included wires feel thin compared to higher-end meter leads. For portable solar users who prioritize end-to-end power visibility over rugged field durability, this meter delivers the measurement range and dual functionality you need without climbing into pro-level pricing.
Check current priceWhat to Look For in a Multimeter for Solar Testing
- Voltage range covering at least 0 - 100V DC for most portable panels
- Current measurement (amperage) capability to confirm actual output under load
- MPPT display or power calculation to see wattage in real time
- LCD or backlit screen for outdoor visibility in bright sunlight
- Safety rating (CAT rating) appropriate for DC circuits if testing larger arrays
- Inline or terminal connection method suited to your panel's connector type